I don't think I've really kept it much of a secret that I am slightly obsessed with Pinterest.
I suppose being crafty is a little in my blood. I mean, my mom has a degree in textile design, and so many of my memories growing up are of her creating something, whether it was cross stitching or basket weaving or amazing Halloween costumes. In fact, to this day, the hum of a sewing machine is a comforting sound, one that I love to hear.
But it wasn't until I was introduced to Pinterest that I really began to think, "Hey, I can probably do that!" My eyes were opened to all these new, fun, crafty ideas that I was dying to try.
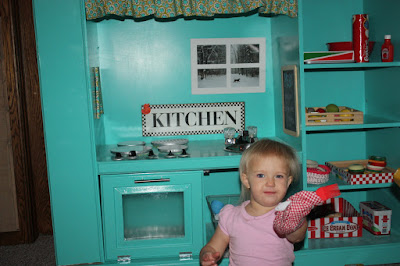
After the first couple of days browsing through other pinners' boards, one idea kept calling to me. All of these people were making totally awesome play kitchens out of old entertainment centers. And I wanted to join in on the fun. So I convinced Mike that Anna needed one, and that we were going to make it for her, and began scouring Craig's List for the perfect piece of furniture that we could transform into a fun little place for Anna to make tea and scrambled eggs for her stuffed animals.
We found one that would work, and transform we did.
I have to admit that it wasn't quite as simple as I had imagined. And the idea about it being so much cheaper than buying one? Yeah, not so much. But I love that it's unique, and I love that Mike and I made it. Every night after Anna would go to bed, we'd spend an hour or two working on it, drinking beer and talking about how much our girl was going to love her new kitchen.
I should have been better about documenting the whole process. If you have specific questions, email me - I'm by no means an expert, but for our lack of knowledge and craftsmanship, I think it turned out pretty darn good!
Here's the basics:
First, we primed the whole thing, then painted. I told the guy at the hardware store what I was doing, and he recommended the type of paint we used, which was a latex base. I have to say that the paint is one of the things I like the least. The color is awesome, but the paint peels off pretty easily. We did seal it using a clear spray paint sealer, but I'm not sure how it will stand up over time. We shall see.
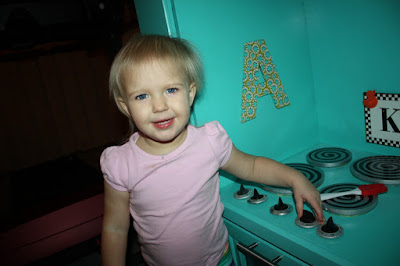
For the fridge door, I first coated it with several coats of magnetic spray paint. It's not as magnetic as I hoped - the spray cans kept clogging. I actually called Krylon and they ended up sending me a refund, which makes me think it must be a common problem. Regular magnets don't work, which is kind of a bummer, but I did find some super powerful ones that will stick. I plan to make some letters or something cute for her to have, but for now we just have a couple of small circles. I then sprayed it with silver metallic paint, the same color I used to spray all the hardware and the burners, which are just wooden circles we picked up at Hobby Lobby. I painted the coils on by hand and glued them on with wood glue.
The sink is a faucet we bought at Walmart, although we probably could have found one cheaper at a salvage yard or thrift store. Editor's Note: I normally HATE shopping at Walmart. HATE. But they had some crazy Black Friday deal on XBoxes that Mike wanted, so we were there shopping without a toddler and had a gift card. Hence, several Walmart purchases. I think we payed around ten bucks. The sink is a dog food bowl from Menard's, but again, we probably could have found something cheaper. Mike was in charge of cutting the hole for the bowl to fit in, and it was probably one of the more annoying tasks. It would be easier if you had some kind of jigsaw, but he did it all by hand. The stove and oven knobs are from a local store that sells refurbished appliances. They were two dollars each - not a great deal, but much cheaper than buying them new at Home Depot or Lowe's. We drilled holes, threaded screws up that fit into the knobs, and then put a little super glue on the ends to help them stay attached.
For the oven door, we busted out the middle piece, and then attached a $3 piece of plexi-glass on the back We bought new hinges and attached them at the bottom, and added a handle we got at Walmart (they came in a two-pack and we used the other one on the fridge).
I made the curtain from fabric I already had, and I think I want to make another curtain to cover the area under the sink. The window frame is from Michael's and we blew up a picture to put inside. The kitchen sign, chalkboard, and 'A' all came from hobby lobby, and I used Modge Podge to cover the 'A' in fabric.
I think that pretty much covers it. Anna scored all kinds of fabulous play food and kitchen accessories for Christmas and her birthday, and she also got a sweet little table to better serve her delicious creations.
Thanks again, Pinterest, for inspiring us to get our craft on!
And if you're in the neighborhood, stop on by. Anna makes a mean wooden pizza that you don't want to miss!


So inspiring! It looks so great. ALMOST want to build one ourselves. Yea, almost. Glad that Cedella gets to play with it from time to time. And Chef Anna? She makes the best pizza!
ReplyDeleteI hope you know that this has inspired me to get off my butt and get working on Nora's playroom. She totally needs a kitchen like this!
ReplyDeleteThis is amazing!!! Thank you for the inspiration
ReplyDeleteI loved that play kitchen so much! Thanks for making it Mama and Dada!
ReplyDelete-Anna, 10 years later